Mass update of user time zones via XrmToolBox

Zeitzonen einstellen Beitragsbild

XrmToolBox: User Settings Utility

In Microsoft Dynamics 365, the default time zone for new user profiles is often set to UTC. To avoid manual adjustments by end users and to ensure consistent time information in the system, system administrators can carry out this configuration centrally and collectively.
The time zone can be adjusted individually in each user’s personal options. However, with a large number of accounts, this manual process is inefficient and error-prone. Standard mass editing of these specific user settings is not provided via the regular Dynamics 365 interface.
Solution via “User Settings Utility”.
It is controlled via the User Settings Utility plugin within the XrmToolBox. This extension enables the simultaneous modification of personal settings for a defined group of users.
Configuration procedure
    • Start the XrmToolBox and connect it to the corresponding Dynamics 365 instance.
    • If required, add the “User Settings Utility” via the integrated Library (Marketplace) tool.
XRM User Settings Utility
    • Use the “Load Users and Settings” function to read all users from the environment.
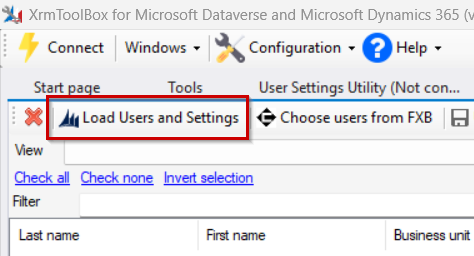
XRM Load Users and Settings 1
    • Select the user accounts in the overview for which the adjustment is to be made.
    • Select the desired time zone in the options.
    • Start the process via the “Update User(s) Settings” button.
Set XRM time zone

The tool logs the process and lists the updated accounts one after the other. Once the import is complete, the new time zone settings for the selected users are active in the system.

D365 Sales: Quick guide for a read-only security role

Cover picture Read Only

Dynamics 365 Sales often lacks a pure “read role”. To create this efficiently, we copy the standard Salesperson role (sales employee) as a basis, as this already has all the necessary background rights for app navigation and login.

The implementation

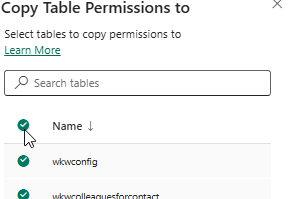
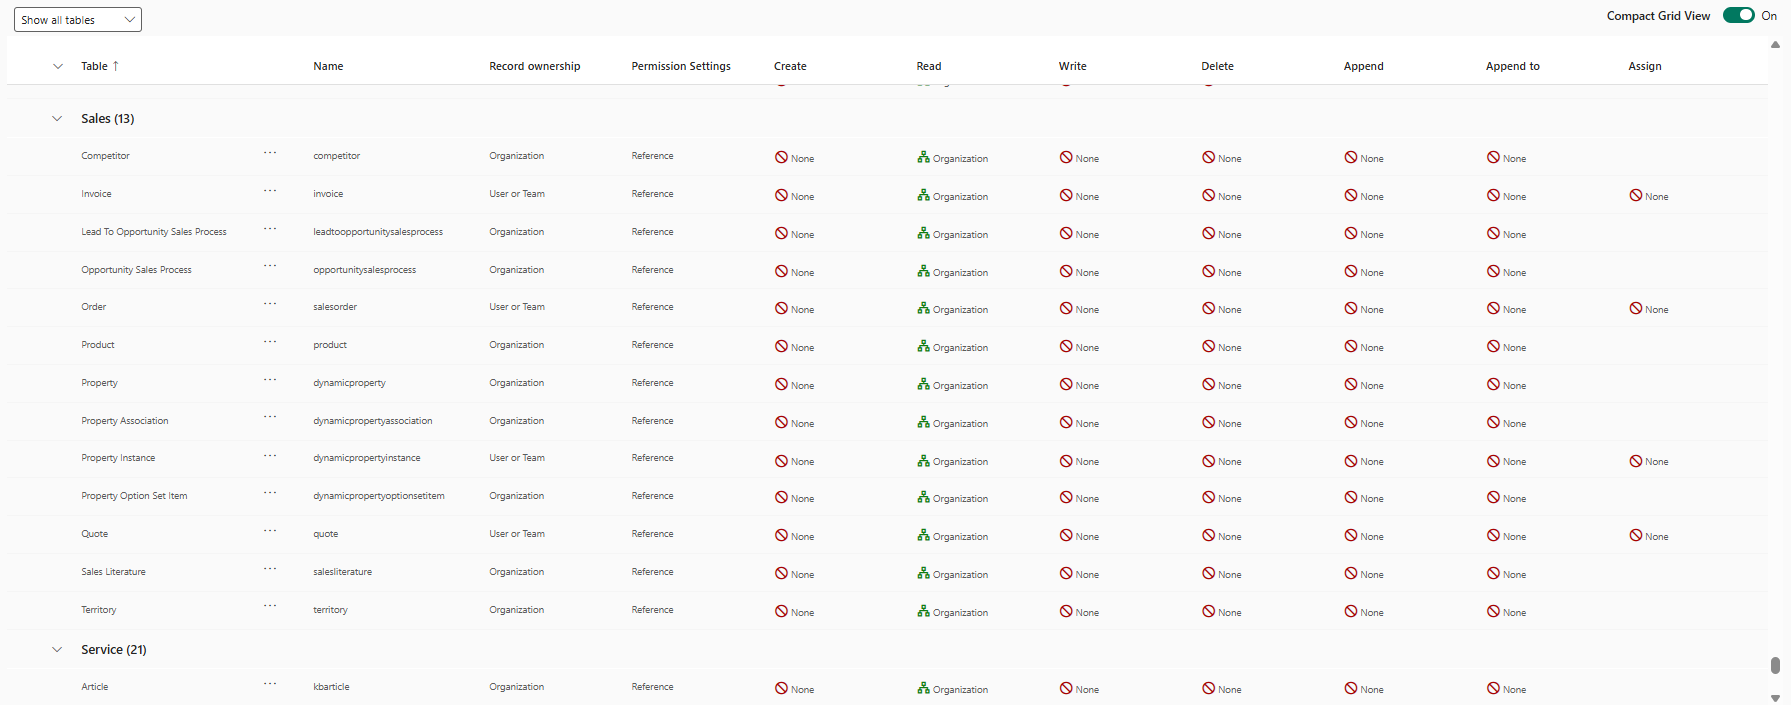
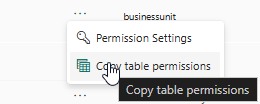
Mass update: Open the copied role and select a table that is already set to Read: Organization. Click on the three dots and select Copy Table Permissions and select all tables.

Select Copy Table Permissions
Select all tables

Deselect exceptions: Before you confirm the changes with Save Changes, you must uncheck certain tables so that no system errors occur:

  • Saved View
  • All tables containing the word “User” (e.g. User Settings, User Dashboard).

To be on the safe side, check all authorizations again to identify any configuration errors. You now have a finished read-only security role that is ready for use.

D365 Sales: Edit unit prices in offers – The secret of miscellaneous privileges

Mouse pointer tries to open lock

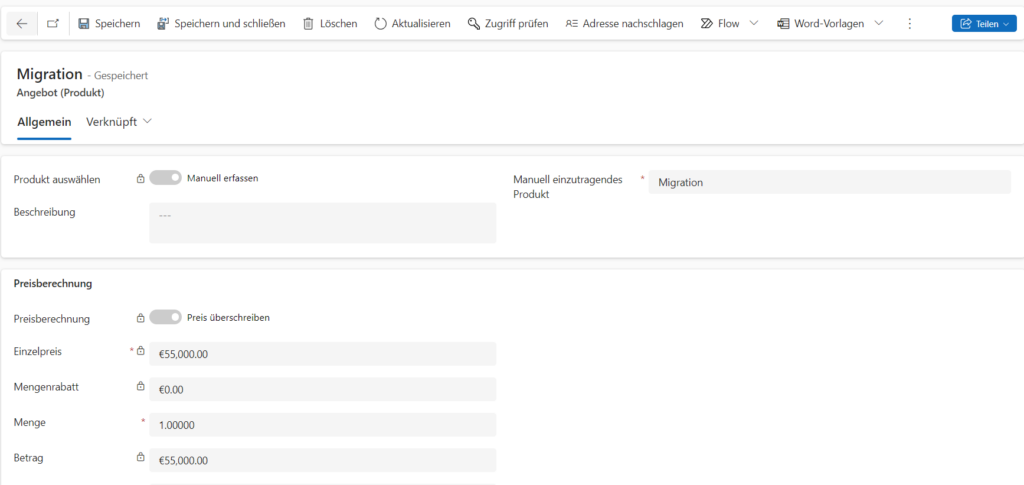
In Microsoft Dynamics 365 Sales, the creation of quotations is part of the core process. In practice, you often come up against a specific hurdle: While administrators can adjust the unit price (Price Per Unit) of manually added products in a Quote Line at any time, this is often blocked for regular users – even if they have write access to the quote.

The problem: Lack of transparency in the table authorizations

If you try to solve this behavior via the security roles at table level, you will quickly notice that the quote line (quote detail) in the list of tables within the security roles is often not intuitive to find or that adjustments there do not bring the desired success. The field remains grayed out for the user, a manual price correction is impossible.

Form of offerProduct

The analysis: Admin vs. user

The hierarchy is clearly defined in the standard system:

  • Administrators: Have extensive rights and can override prices to respond to individual negotiation situations.
  • Standard users: Are often tied to the price list logic, which can limit flexibility in daily business.

The solution: Miscellaneous Privileges

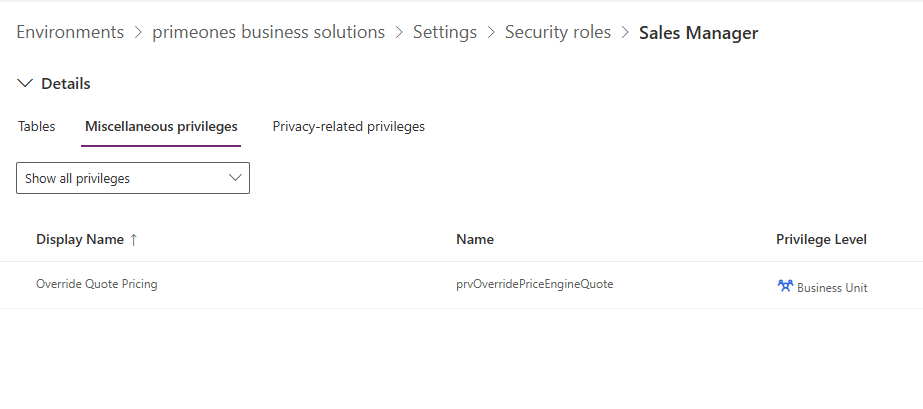
View Security Role Override Quote Pricing

The solution does not lie in the classic table authorizations (Create, Read, Write), but in the so-called Miscellaneous Privileges within the security role.

To enable users to edit prices in quotation lines, the following step must be carried out:

  1. Navigate to the security roles in the Power Platform Admin Center.
  2. Select the relevant role and open the Miscellaneous Privileges tab.
  3. In the “Miscellaneous Privileges” area, search for “Override Quote Pricing” and adjust the privilege level accordingly.

Conclusion

Small cause, big effect: The granularity of Dynamics 365 enables precise control, but requires detailed knowledge of the hidden privileges beyond the standard CRUD matrix. By adapting the miscellaneous privileges, the necessary flexibility in the sales process is restored.

“Chill-out” step for stressed APIs in Oracle Integration 🧘‍♂️

1B0171F4 8BD7 40C6 A9F6 1007A0680CA8 1 201 a

If you work with Oracle Integration Cloud, sooner or later you will encounter a problem with API rate limits.
The integration receives a huge data collection, but the target API only accepts individual calls.
Or, even more complex, various individual steps have to be set in the target system and the interface receives many calls in a short time.
This is not a problem as long as you do not hit a request limit. Then the API responds mercilessly with an error and keeps us waiting.

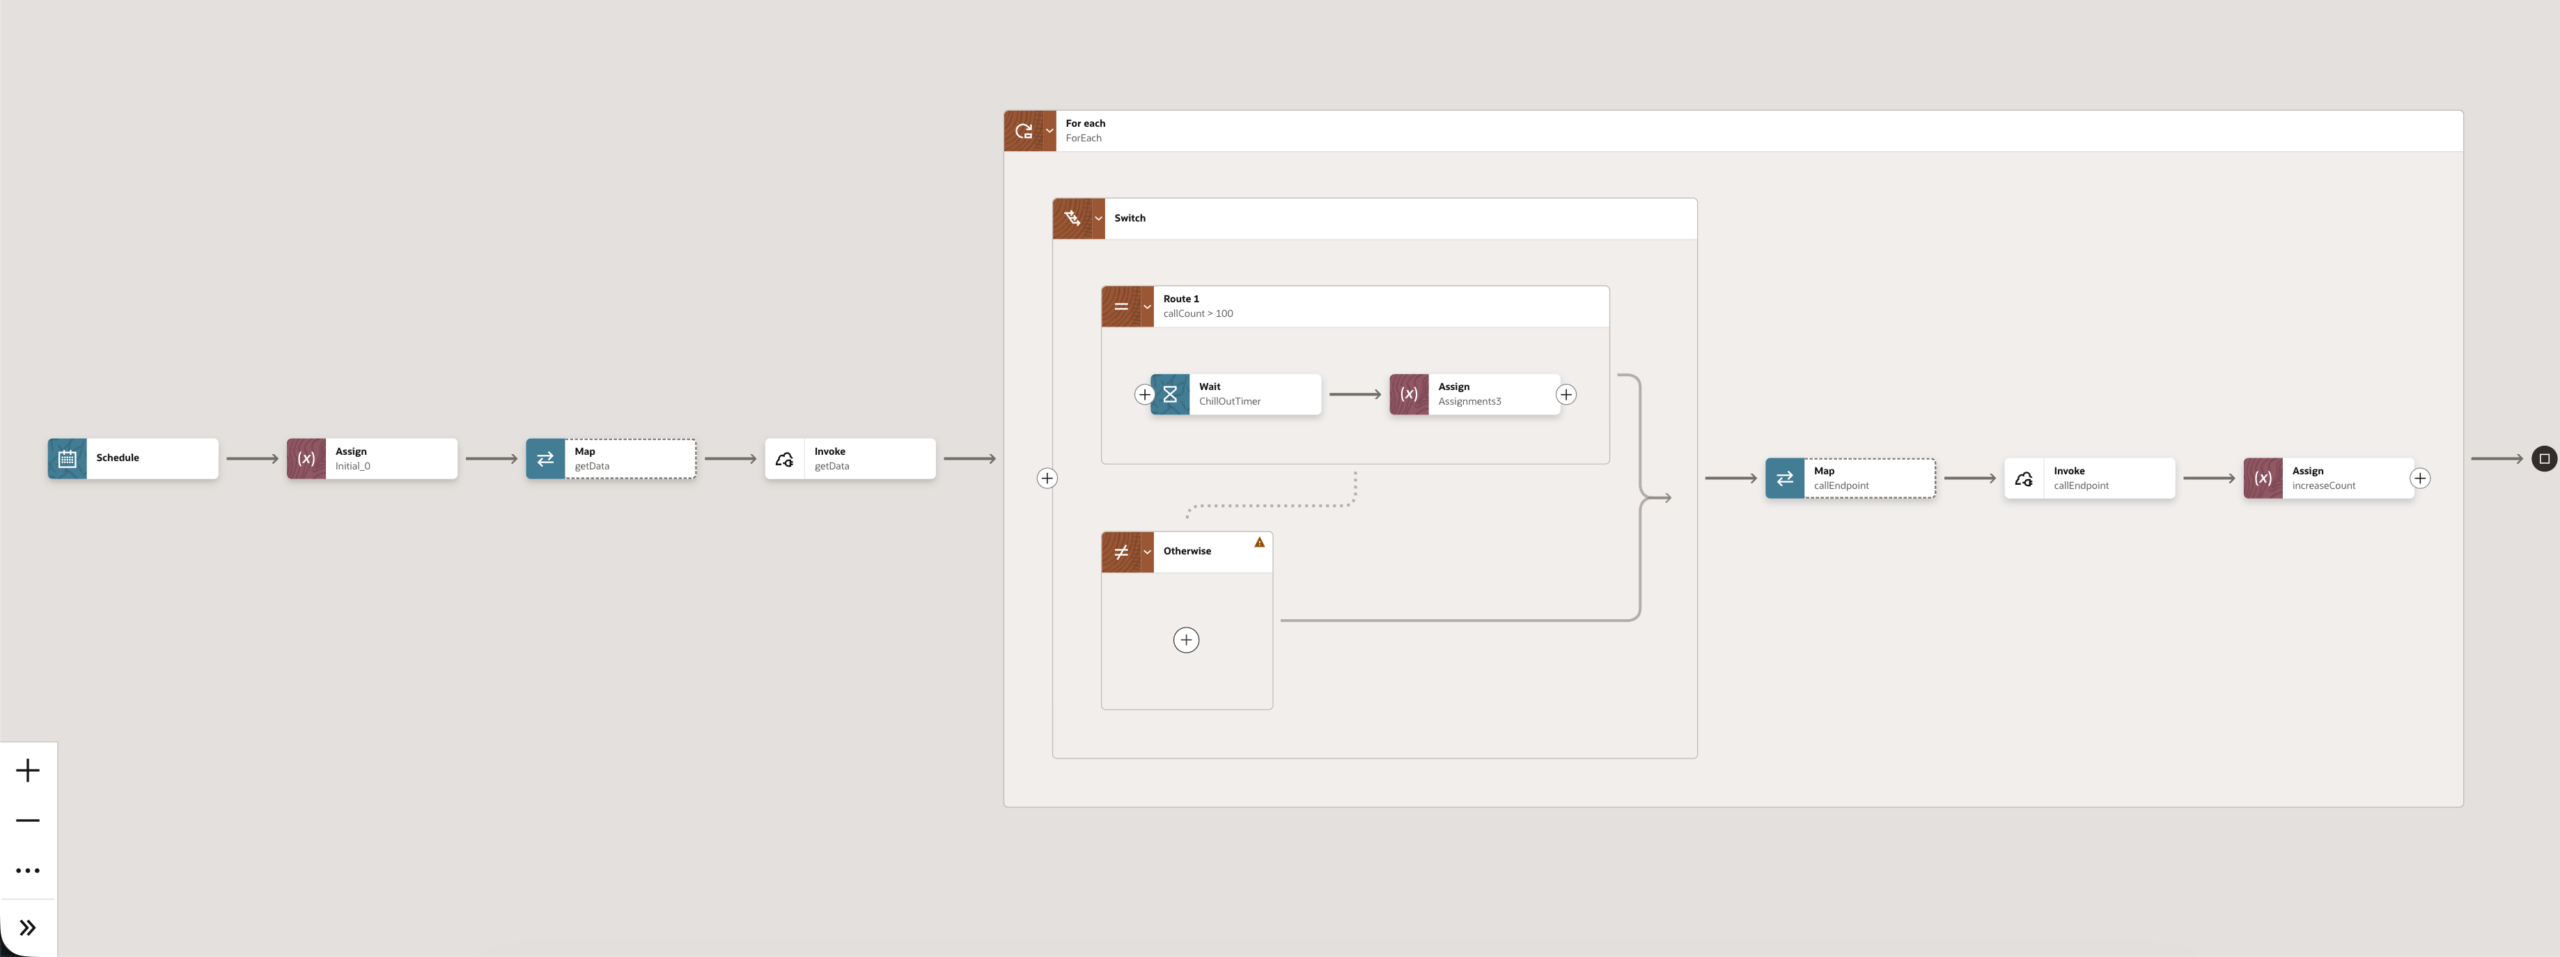
In this tutorial, we will show you how to add a “chill-out” step to your integration in just a few steps using a little logic and the Wait Activity.

The scenario

  • A database provides us with the latest leads via REST API as a JSON array
  • We transfer these leads to our CRM, but the CRM’s REST API only allows the creation of one data record per call
  • We use a ForEach loop and work through the individual leads in order
  • The CRM has an API limit of 100 calls per 5 minutes. However, Oracle Integration sends several calls per second.
  • We reach the limit, the CRM API responds with“429 – Too Many Requests
  • The integration throws an error and stops.

To prevent this, we build a “chill-out” step into the integration and give the integration time to wait for the request limit and then transfer the next batch of data.

The solution in 5 quick steps

Initialize the variable

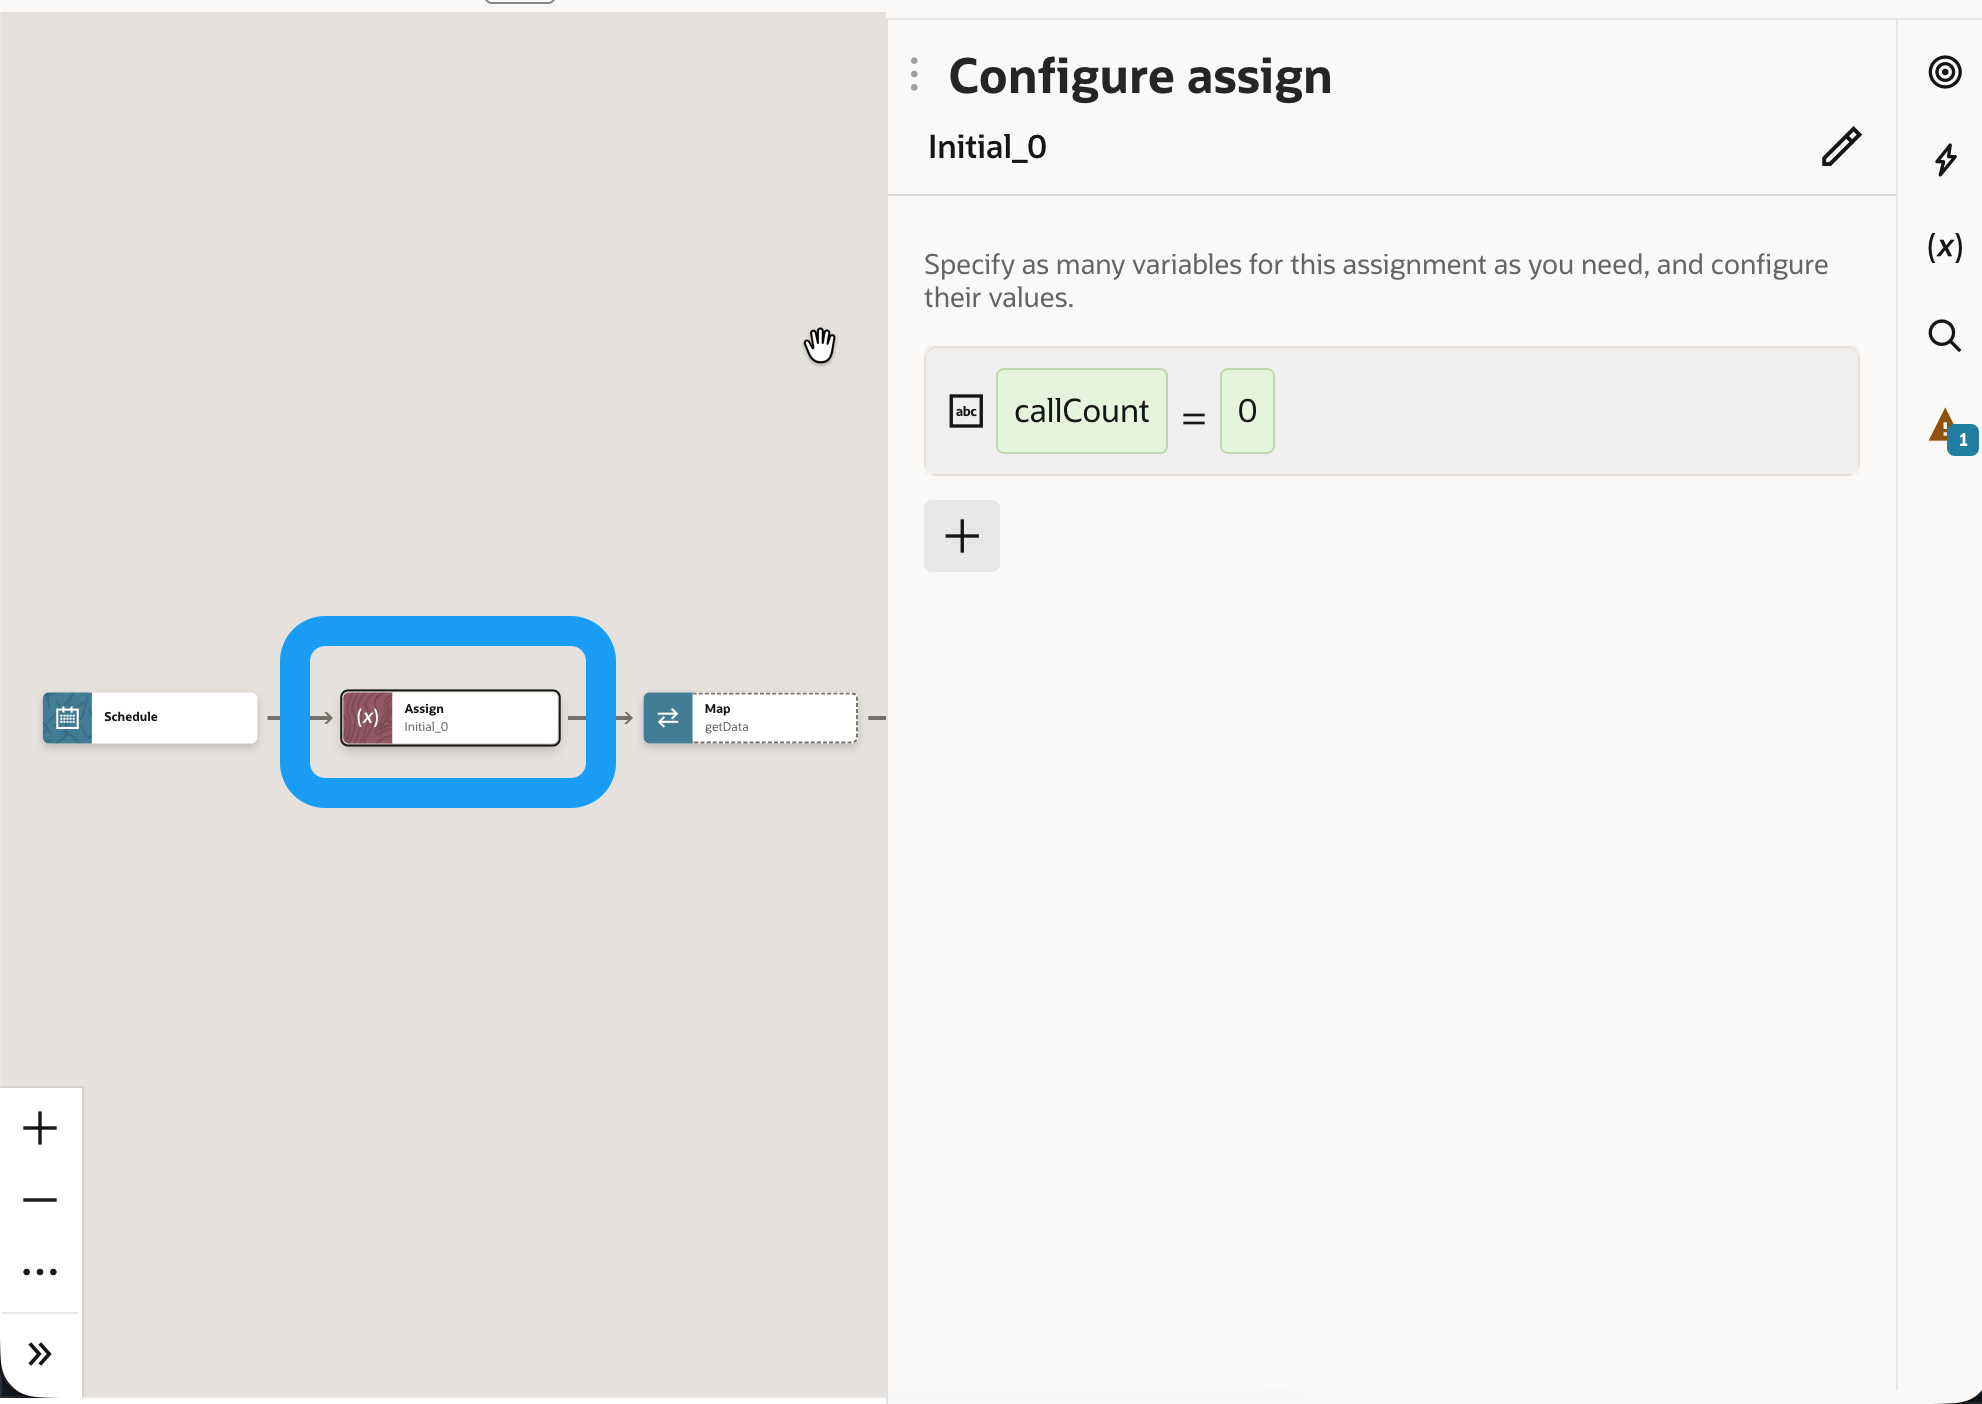
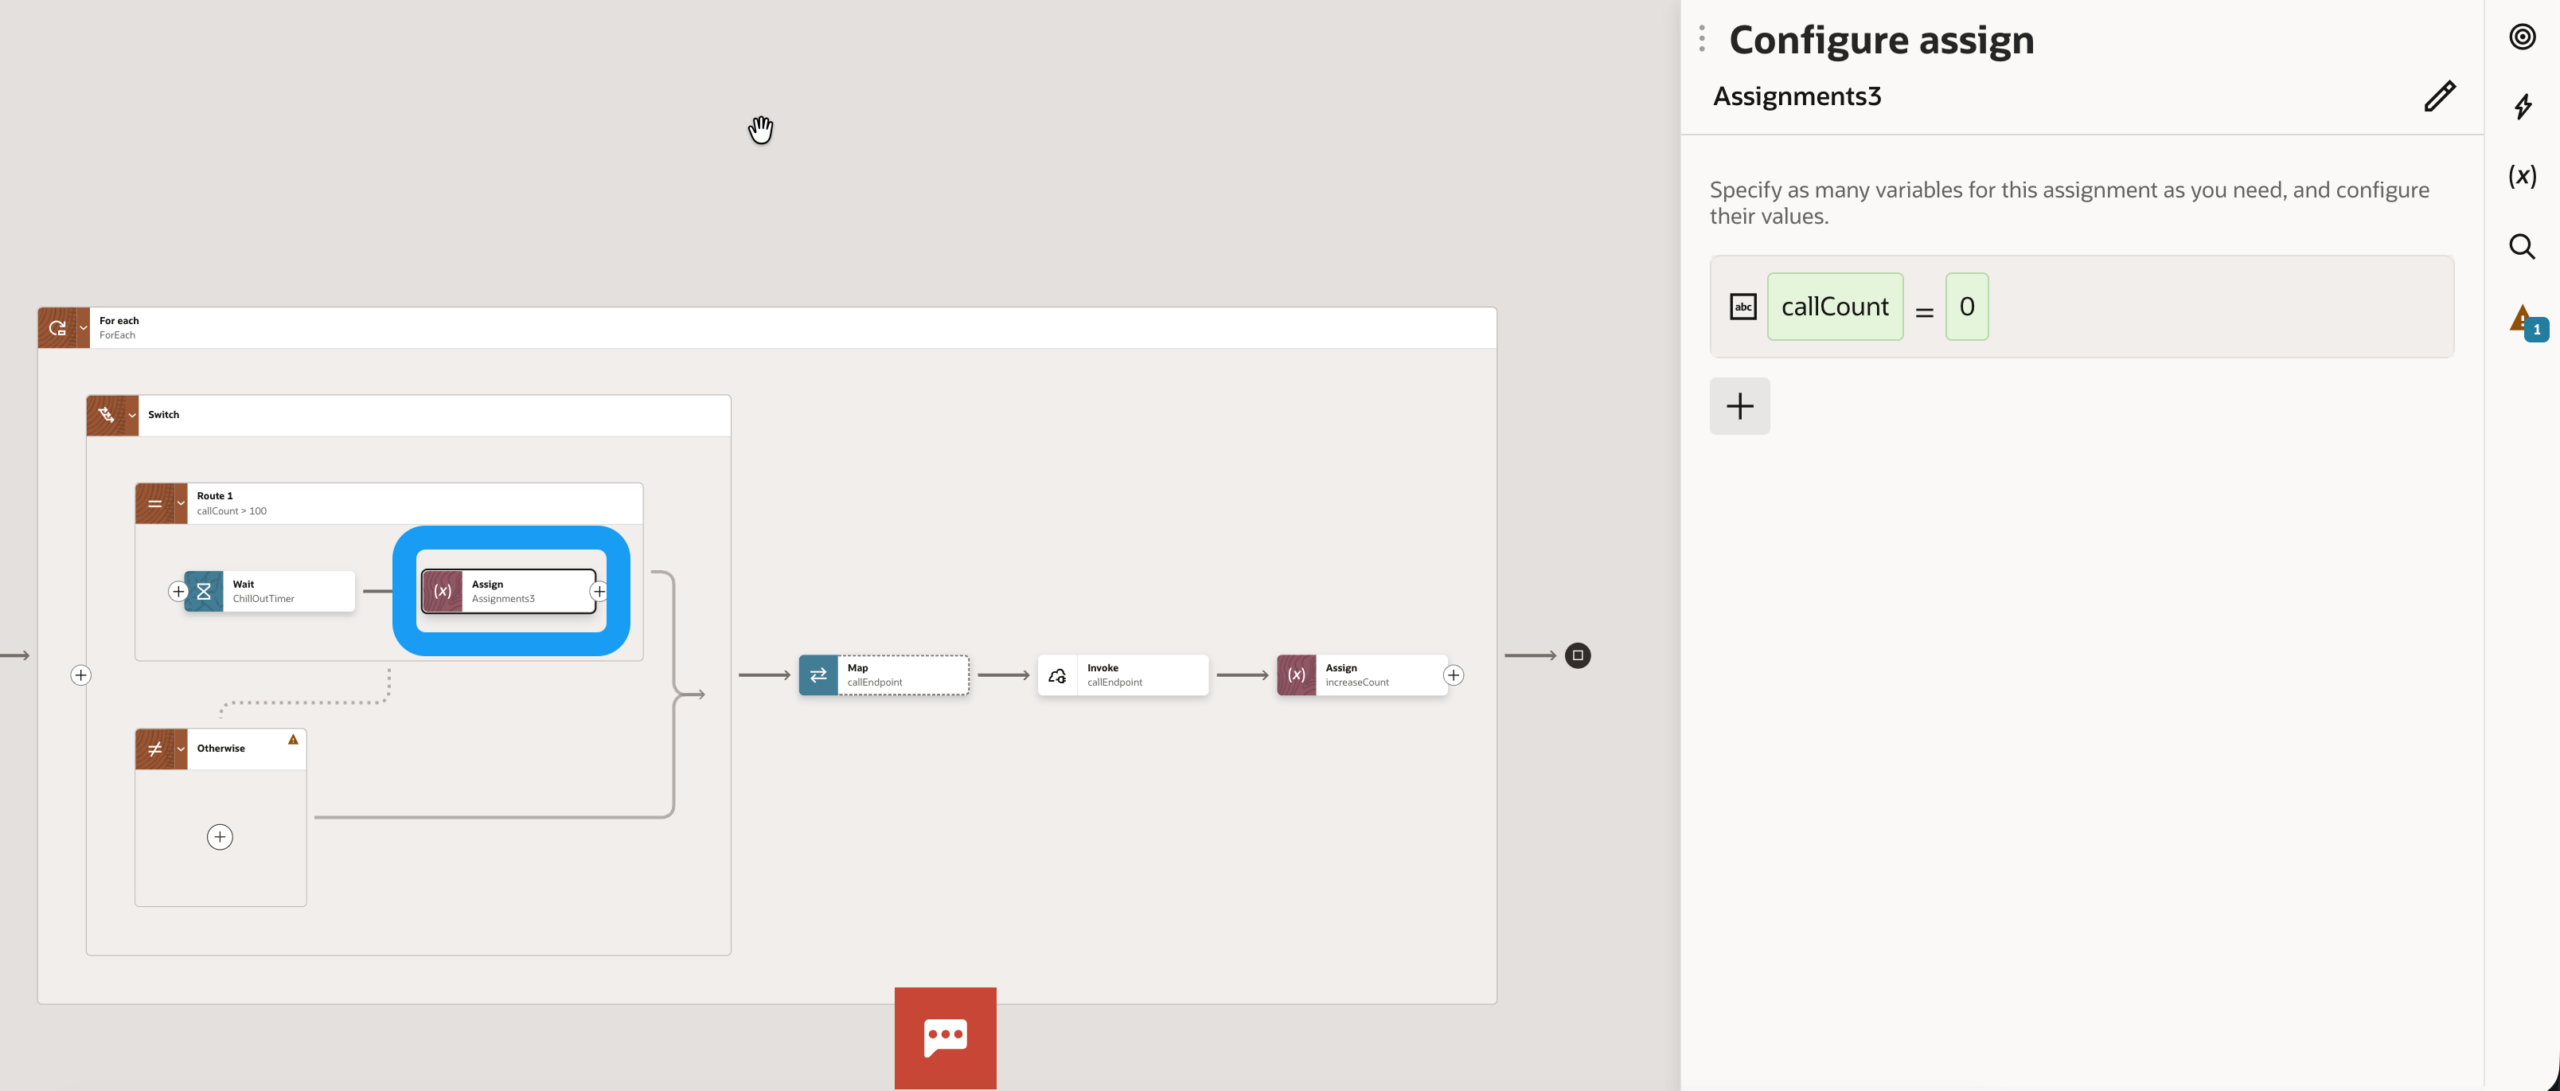
Before the For Each loop, we set a variable (e.g. callCount) with the value 0. This variable counts the calls for us.

Increase the value of the variable after each API call

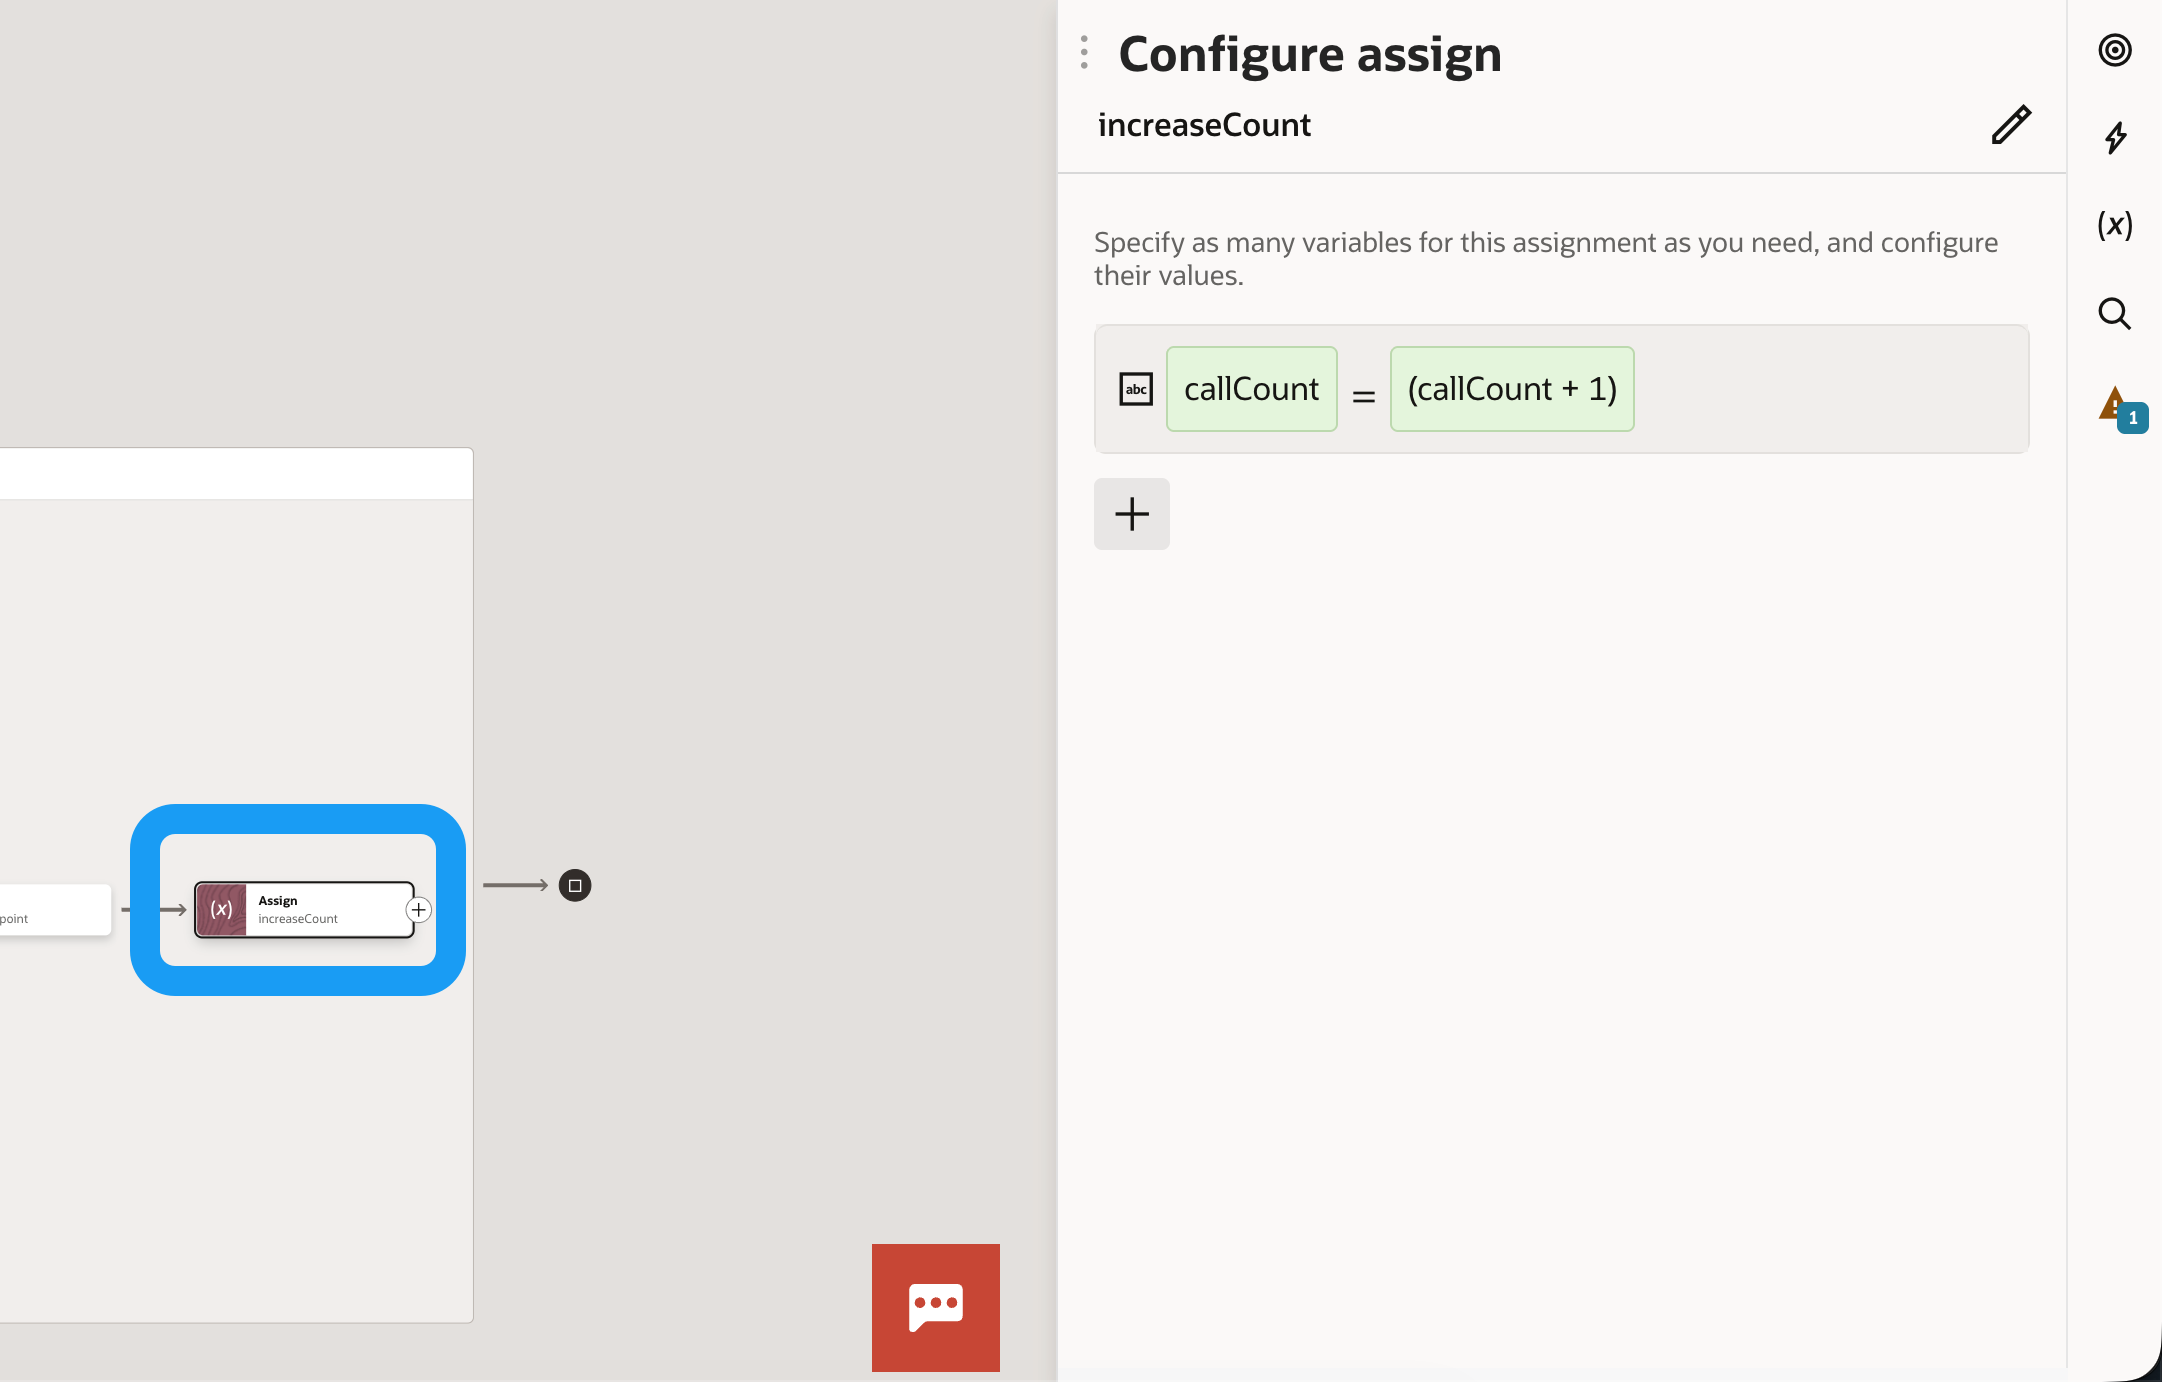
In our case, a single API call is made for each array element and we increment the counter by 1

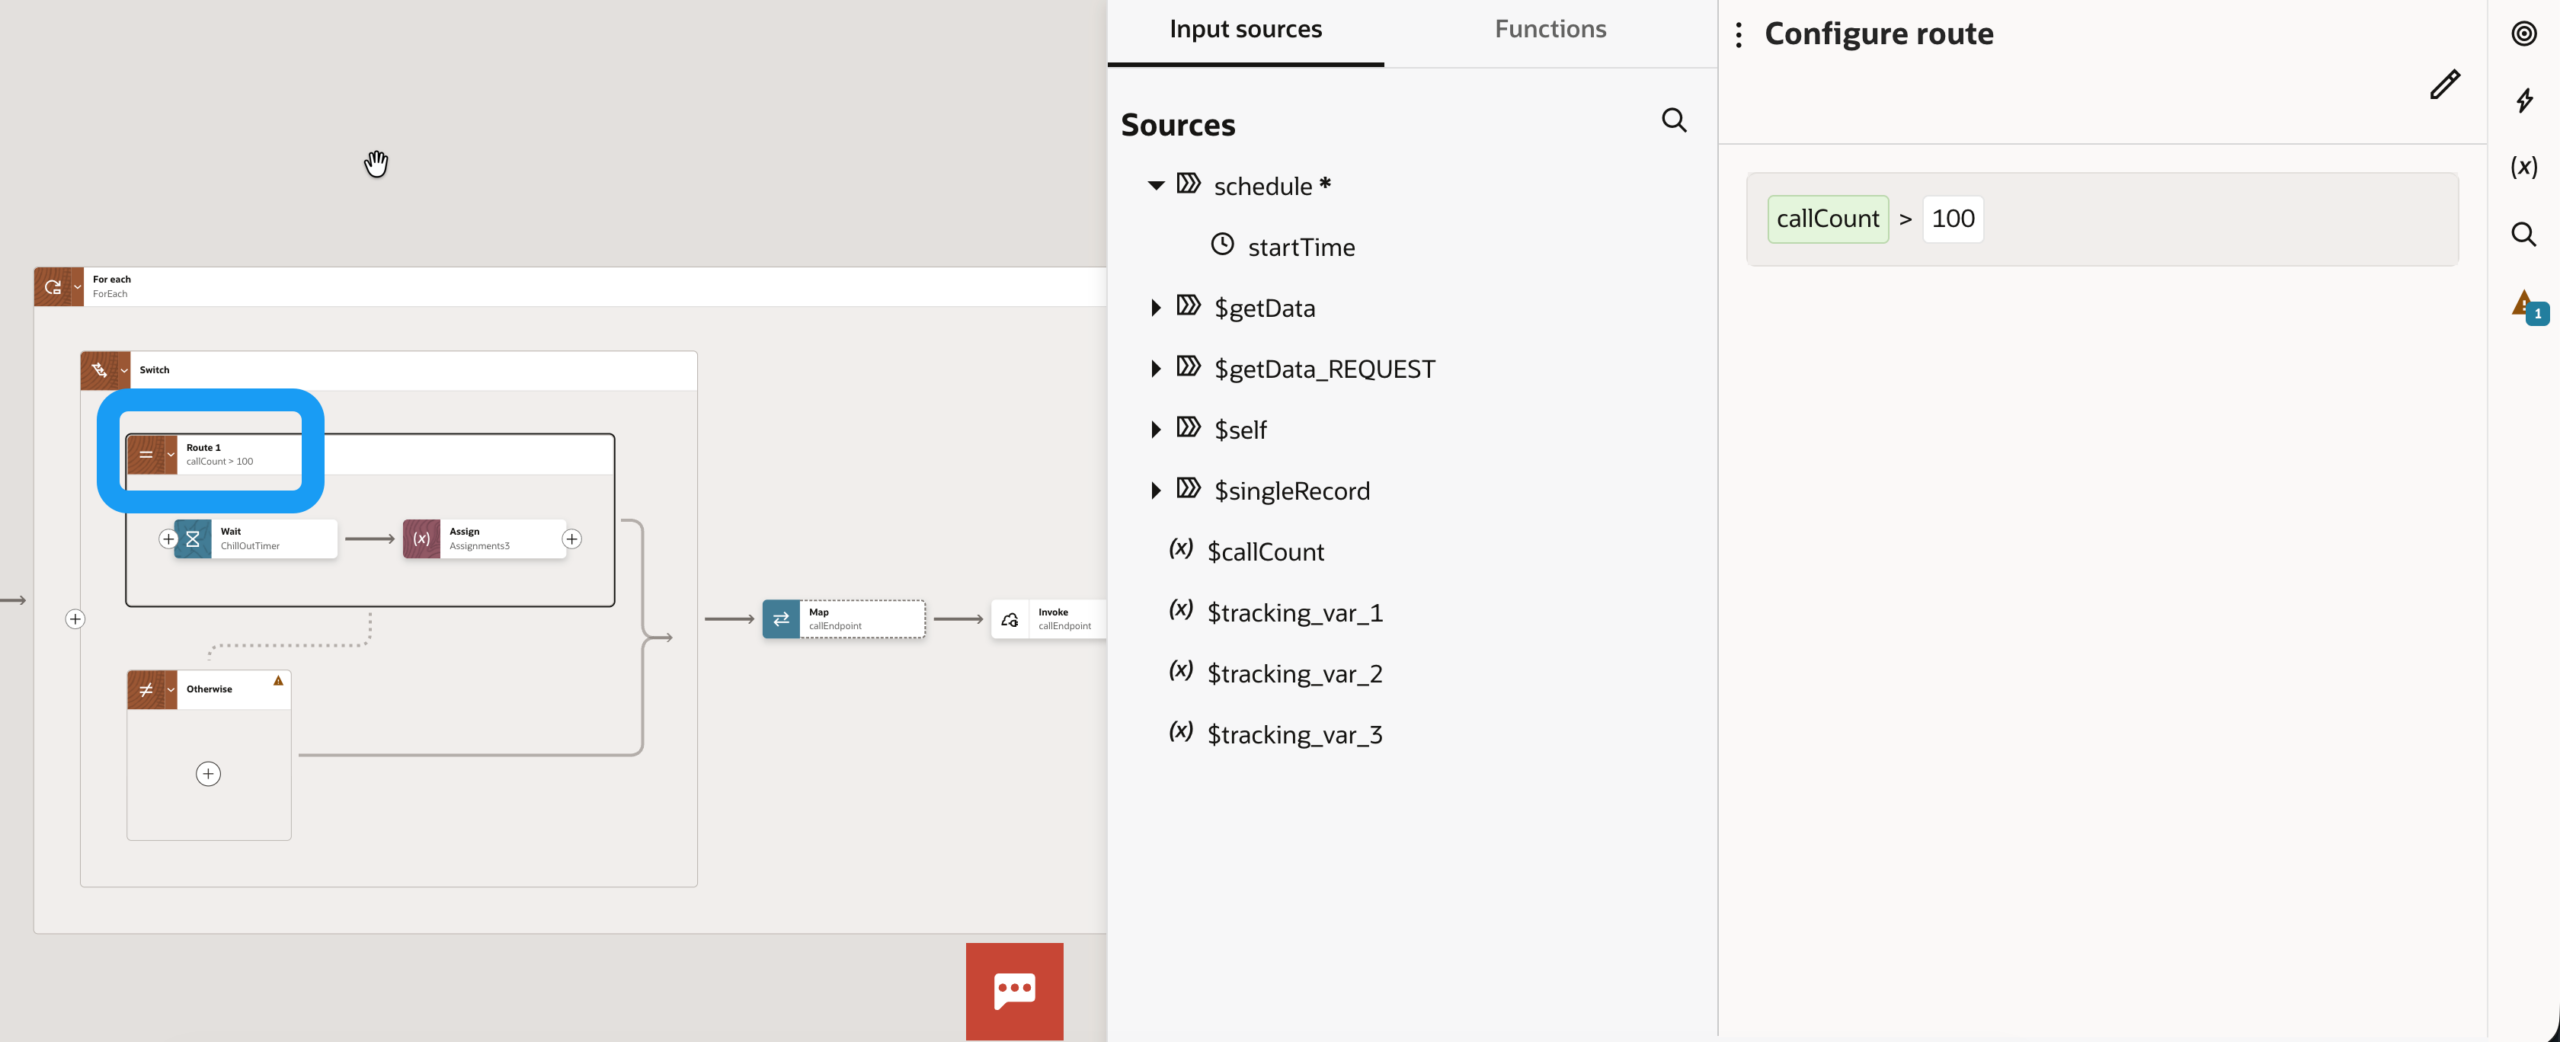
A switch within the ForEach loop

This is where we set the API limit, which we hopefully know from the API documentation or, if not, approximate by trial and error. In our case, this is 100 calls. The condition therefore specifies that we need a pause from call 101

If the switch condition is met and the API limit has been reached:

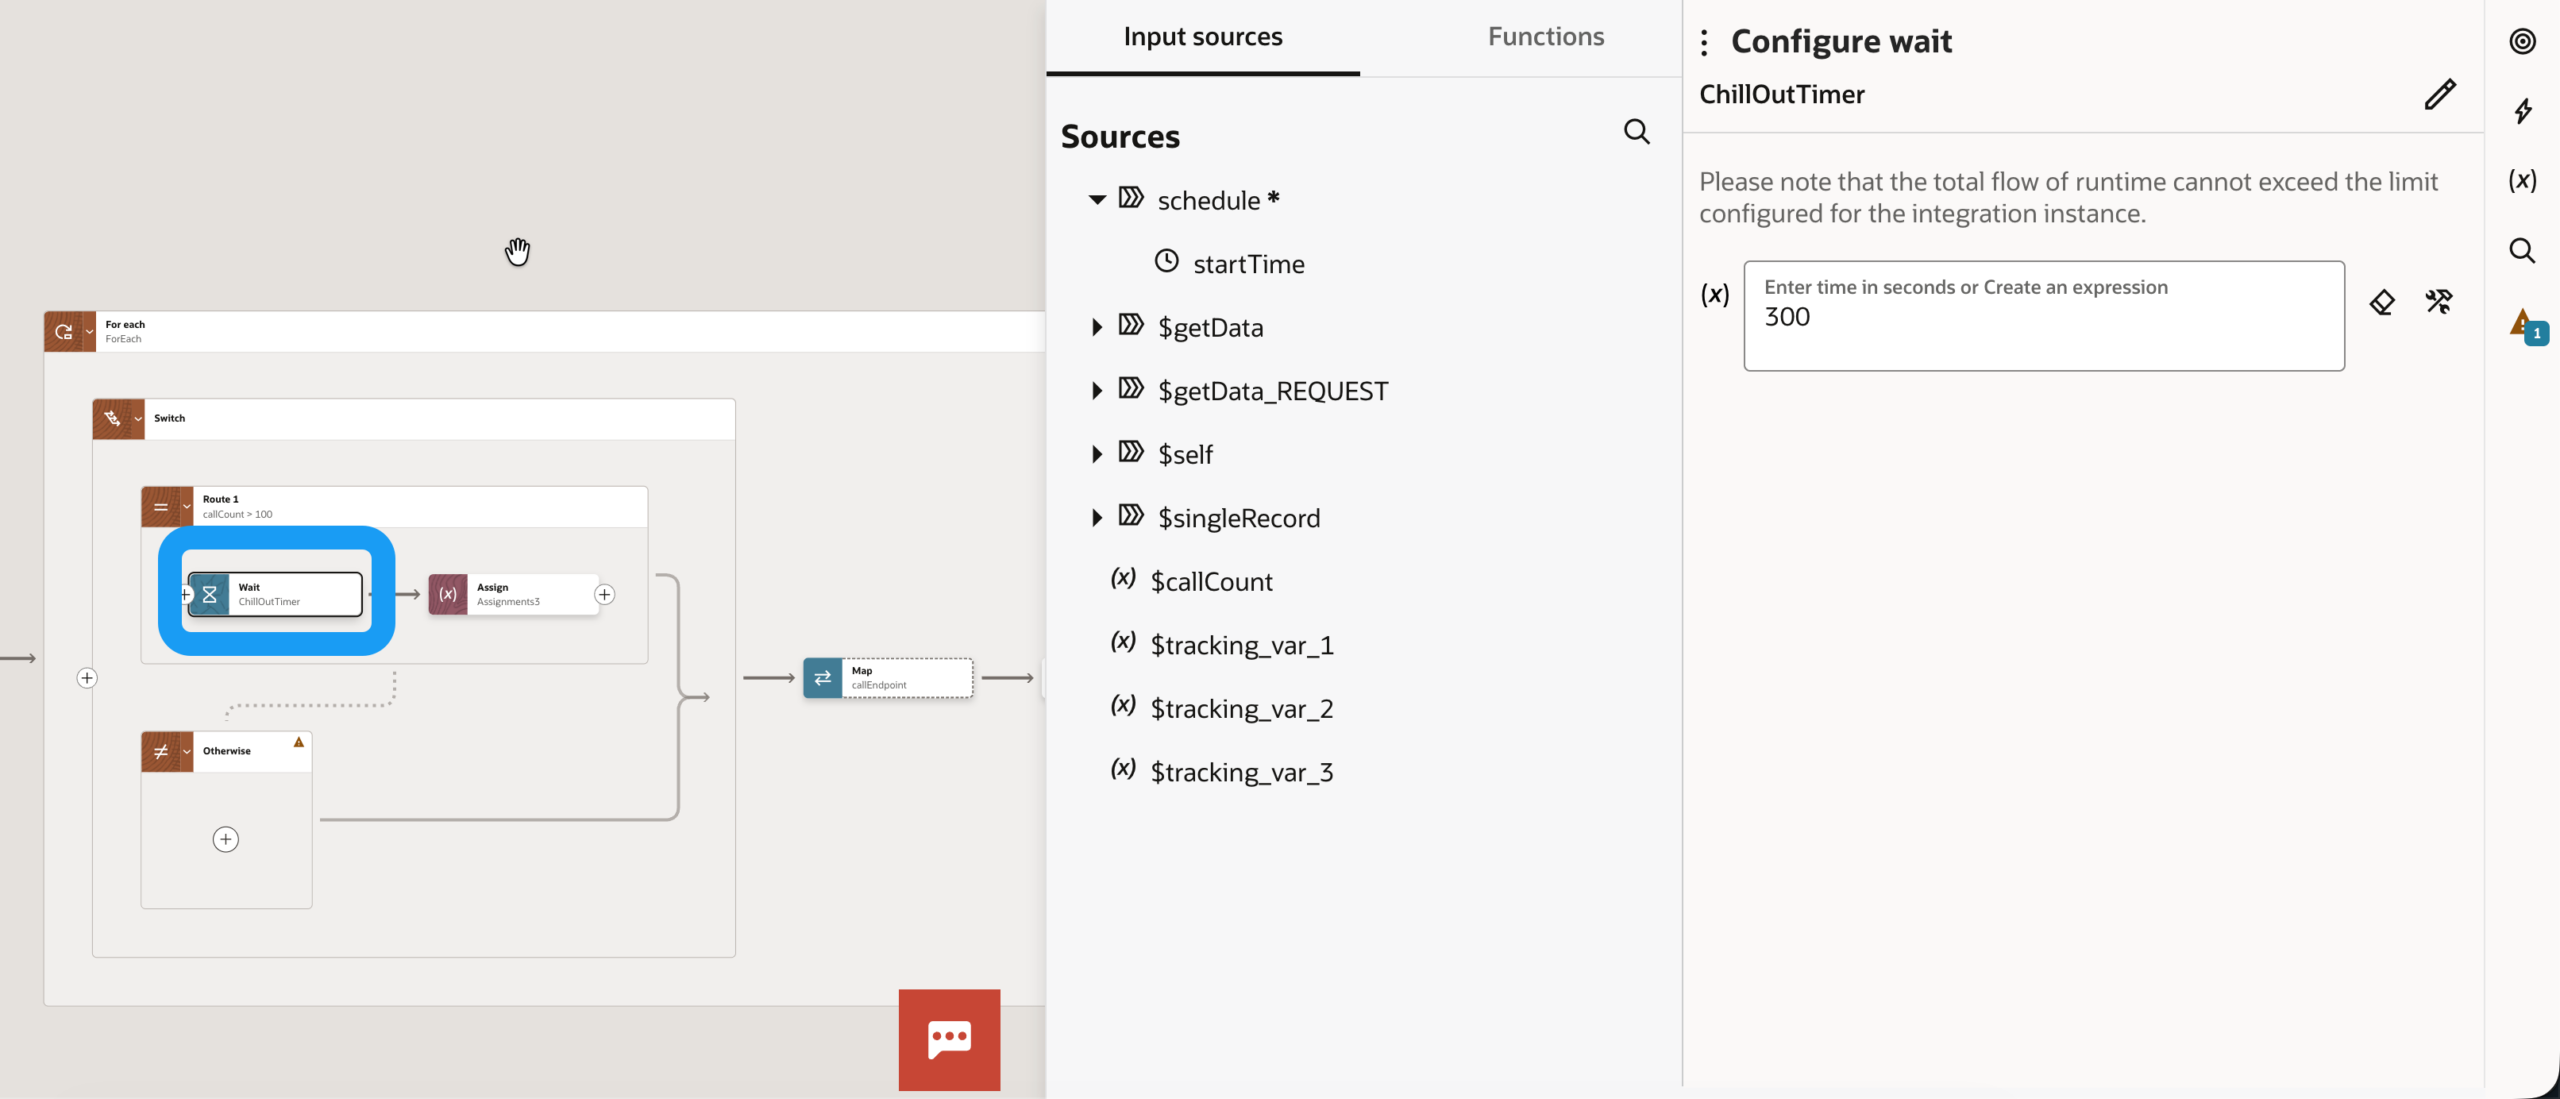
Insert a wait step

We now let the integration cool down until it is safe to call up the target interface again. In our case, this is 5 minutes (300 seconds)

Reset the counter

Finally, we set the counter back to 0. The integration transmits data again until the limit is reached again.

The result

A resilient integration that regulates itself. We process large volumes of data stably without overloading the target systems or risking error messages in monitoring.

D365 Sales Quick Campaign: Start quick sales campaigns

quick campaign

Did you know that you don’t need huge marketing automation in Microsoft Dynamics 365 Sales to launch a targeted sales campaign? If you need to do it quickly – for example for a telephone campaign or a follow-up – the Quick Campaign is your best tool.

What is a Quick Campaign?

With Quick Campaign, you can create a single activity for the entire group directly from a list of contacts, companies or leads.

Step-by-step: The "Call Campaign" example

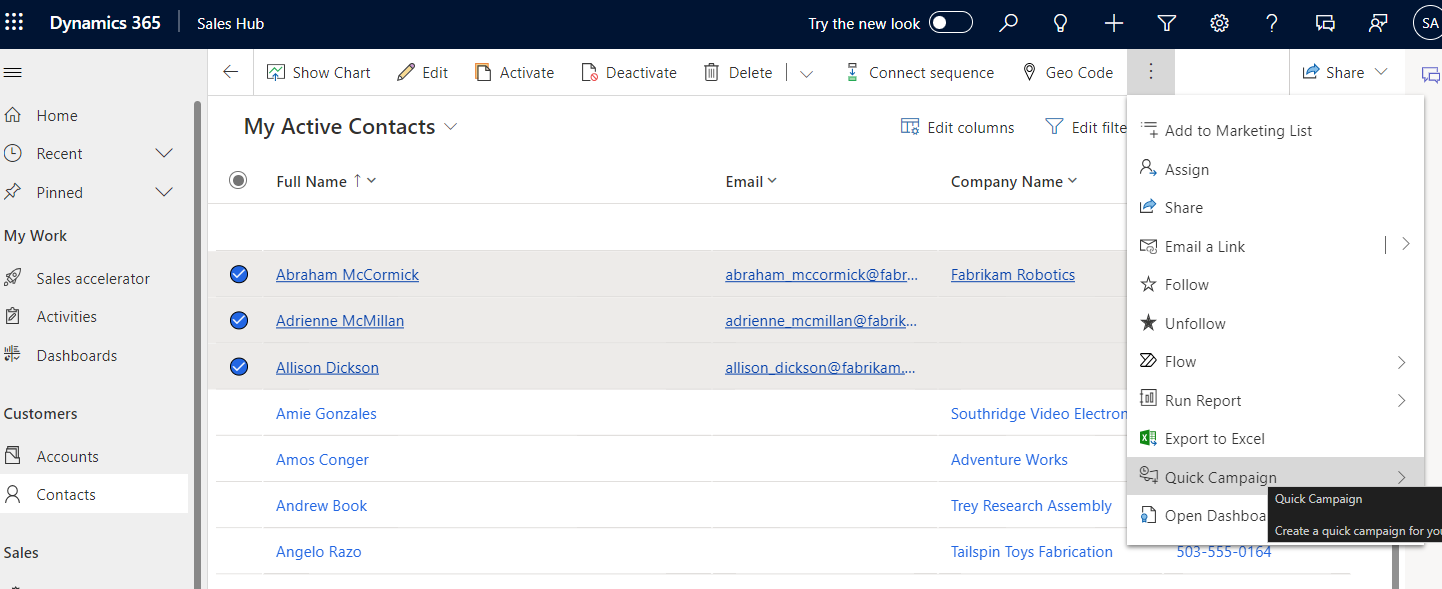
  1. Select target group: Navigate to the Contacts menu item.

  2. Make a selection: Select the desired persons in the list.

  3. Start: Click on Quick Campaign in the command bar.

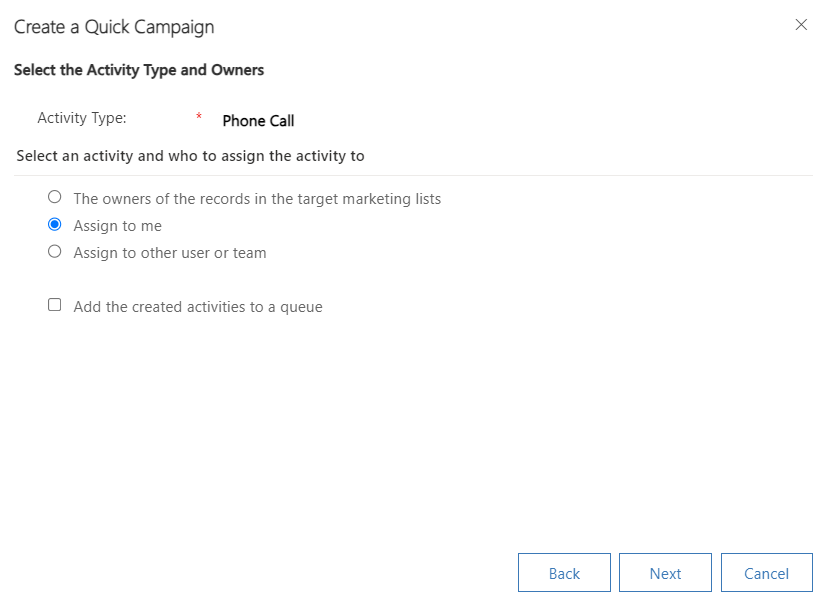
  4. Follow the assistant: Select “Phone Call” as the activity type and assign the tasks to yourself or your team.

Figure 7 1
Figure 8 1

Process activities efficiently

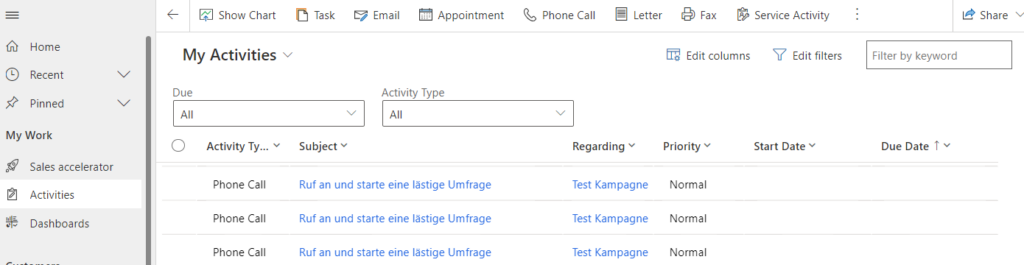
  1. As soon as the campaign has been created, you will find the tasks clearly arranged in the system:

    • Central view: You can call up the scheduled calls individually under Activities.

Figure 9 2
    • Workflow: You have direct access to all information during the call.

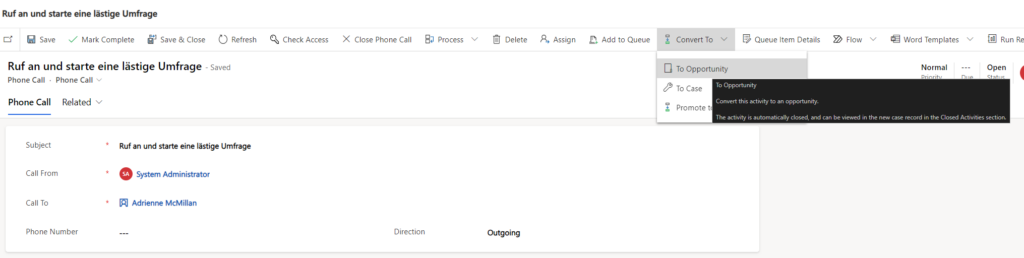
    • Closing: After the interview, you can close the activity as a Mark Complete or, if successful, convert it directly into an opportunity.

Figure 10 1

Conclusion: Minimum effort, maximum structure for your sales day!

Easily keep an eye on important data records in Dynamics 365 Sales with the timeline pinning function

When working with Dynamics 365 Sales, it is quite normal for the timeline to be filled with many activities and notes. Scrolling through everything just to find an important entry can take a lot of time. This is exactly where the pinning function comes into play.

If this function has been activated by your system administrator and your security role allows this (with write and delete rights), you can pin certain data records, such as notes or activities, so that they always remain at the top of the timeline. This makes it much easier to find them again later.

To pin a data record, simply click on the pin symbol next to it. The entry is moved to a special area at the top of the timeline, which is labeled “Pinned”. This area shows how many data records are pinned and allows a maximum of 15 entries at the same time. Each pinned data record remains there for one year unless it is deleted manually.

Quick tip on permissions:
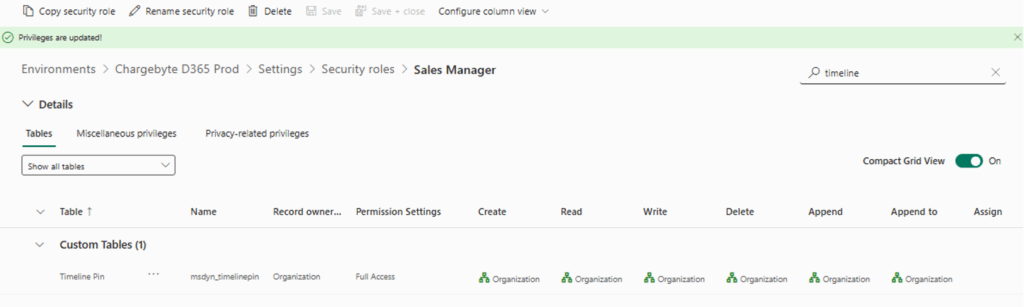
If pinning does not work for you, check the settings for your security role. You will find “Timeline Pin” under the “Custom Entities” tab. The Create, Read and Delete authorizations must be activated here. This configuration is included in the default role “Basic User”, which is why assigning this role often solves the problem.
As this setting is made at organization level, pinned records are visible to all users who can see the timeline of this entity.

Pinning is perhaps only a small function. For many users, however, it makes navigating through data records much faster and more efficient.

I hope this guide has been helpful for some of you.
Stay tuned for more useful tips and best practices to help you get the most out of Dataverse.
Feel free to contact our Microsoft experts with any questions.

End of the year: Reset AutoNumber start value in Dynamics 365 Sales

D365 sales reset autonumber

In Microsoft Dynamics 365 Sales, quote IDs are often created using the AutoNumber function with a consecutive start value. In some cases, however, it is desirable for the numbering to reset at the beginning of the year instead of simply continuing indefinitely.

Here I’ll show you how we solved this challenge with Power Automate.


🔧 The challenge

By default, the AutoNumber sequence does not reset with the new year. Example:

  • Offer ID sequence: A24-998, A24-999, A24-1000 …

In our case, we wanted to prevent the offer numbers from becoming five digits (e.g. A24-1000) as soon as the new year begins. Instead, they will start again in January of the new year at A25-001.

🧩 The solution: annual reset via Power Automate

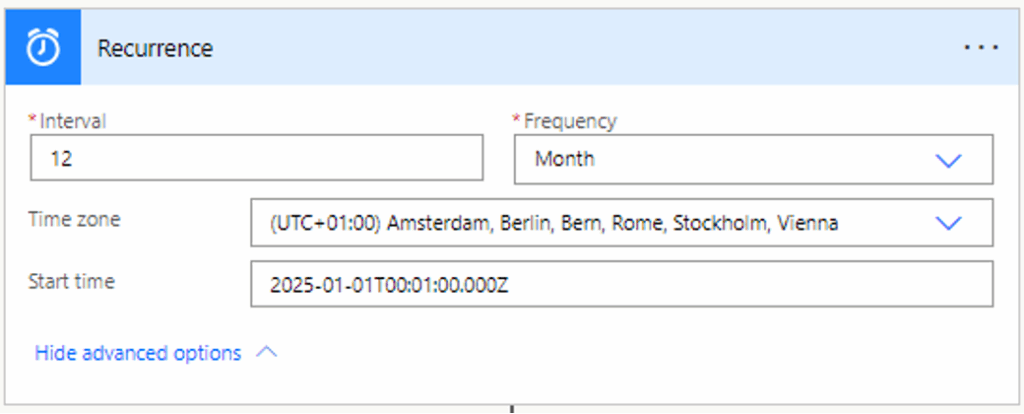
We have created a recurring Power Automate flow that is executed once a year at 00:01.

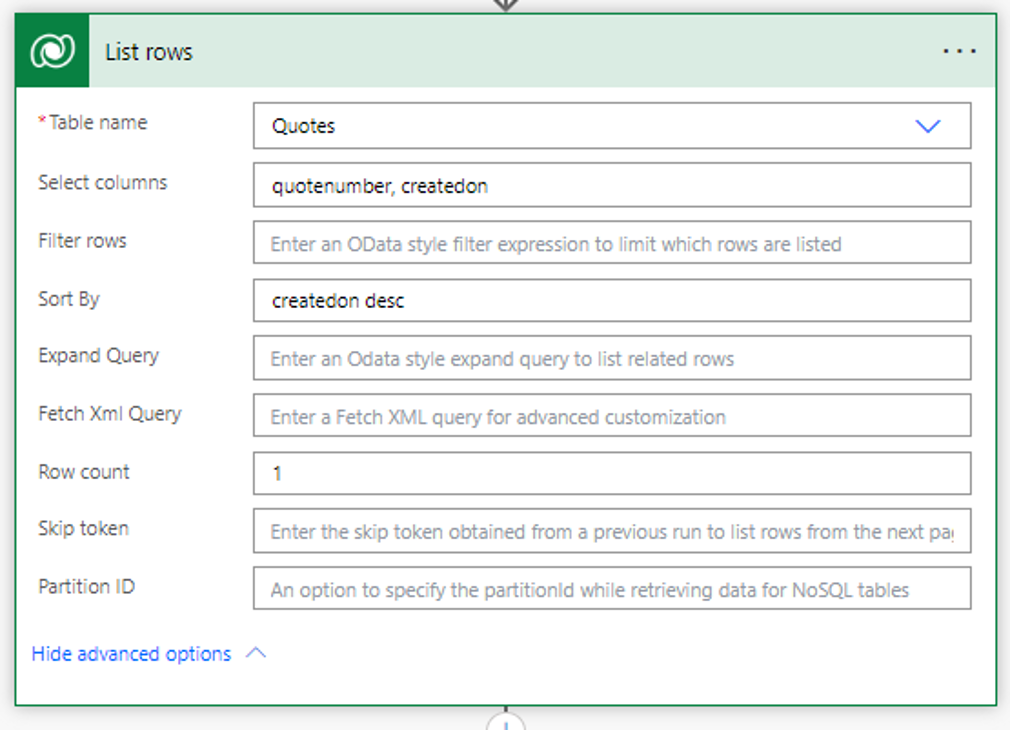
1. call up last offer

With the List Rows action:

  • Order By: createdon desc
  • Row Count: 1

This is how we retrieve the last quotation data record created.

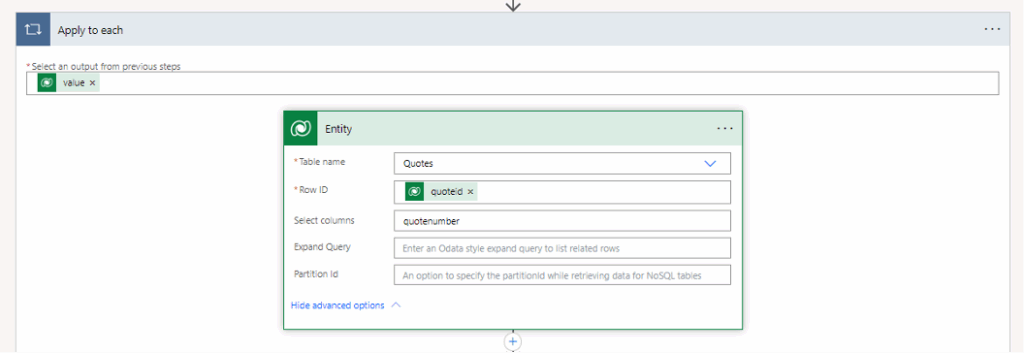
2. apply to Each

We pack the output into an “Apply to each” loop:
outputs(‘List_rows’)?[‘body/value’]

To make it easier for us to access the fields later, we then use “Get a row by ID” to retrieve the complete offer data record and rename this step “Entity”.

3. check whether the year has changed

Now comes the core logic

We compare the year in the offer ID with the current calendar:

  • Extract year from offer ID

int(substring(outputs(‘Entity’)?[‘body/quotenumber’]
add(indexOf(outputs(‘Entity’)?[‘body/quotenumber’], ‘A’), 1), 2))

Result: 24

  • Extract current year

int(substring(formatDateTime(utcNow(), ‘yyyy’), 2, 2))

Result: 25

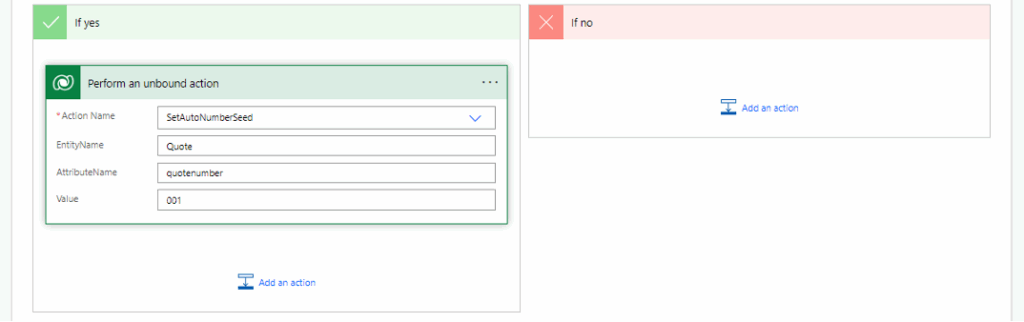
If the year in the offer ID is smaller than the current year, we reset the AutoNumber start value.

4. reset start value

We use the “Perform an unbound action” campaign:

  • Action Name: SetAutoNumberSeed
  • Target Field: quotenumber
  • Seed Value: 001

The next offer ID in the new year will therefore start again at A25-001.01.

✅ Result

This method keeps your D365 Sales clean and structured: The offer numbers always show the current year, without any manual intervention or the risk of IDs suddenly becoming five digits long.

I hope this guide has helped you.
Stay tuned for more useful tips and best practices to help you get the most out of Dataverse.
If you have any questions, please feel free to contact our Microsoft experts.