Easily keep an eye on important data records in Dynamics 365 Sales with the timeline pinning function

When working with Dynamics 365 Sales, it is quite normal for the timeline to be filled with many activities and notes. Scrolling through everything just to find an important entry can take a lot of time. This is exactly where the pinning function comes into play.

If this function has been activated by your system administrator and your security role allows this (with write and delete rights), you can pin certain data records, such as notes or activities, so that they always remain at the top of the timeline. This makes it much easier to find them again later.

To pin a data record, simply click on the pin symbol next to it. The entry is moved to a special area at the top of the timeline, which is labeled “Pinned”. This area shows how many data records are pinned and allows a maximum of 15 entries at the same time. Each pinned data record remains there for one year unless it is deleted manually.

Quick tip on permissions:
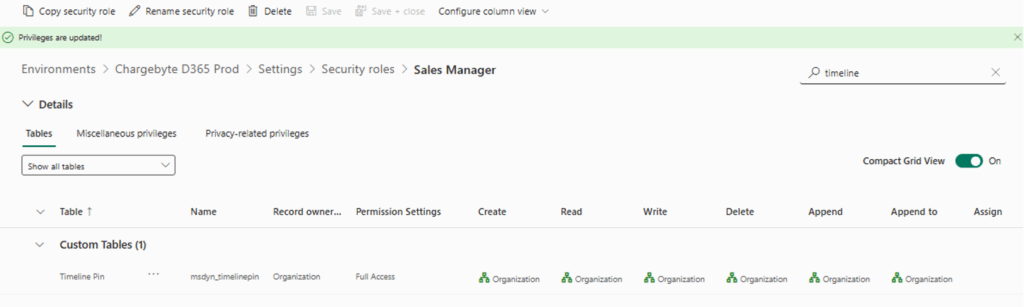
If pinning does not work for you, check the settings for your security role. You will find “Timeline Pin” under the “Custom Entities” tab. The Create, Read and Delete authorizations must be activated here. This configuration is included in the default role “Basic User”, which is why assigning this role often solves the problem.
As this setting is made at organization level, pinned records are visible to all users who can see the timeline of this entity.

Pinning is perhaps only a small function. For many users, however, it makes navigating through data records much faster and more efficient.

I hope this guide has been helpful for some of you.
Stay tuned for more useful tips and best practices to help you get the most out of Dataverse.
Feel free to contact our Microsoft experts with any questions.

End of the year: Reset AutoNumber start value in Dynamics 365 Sales

In Microsoft Dynamics 365 Sales, quote IDs are often created using the AutoNumber function with a consecutive start value. In some cases, however, it is desirable for the numbering to reset at the beginning of the year instead of simply continuing indefinitely.

Here I’ll show you how we solved this challenge with Power Automate.


🔧 The challenge

By default, the AutoNumber sequence does not reset with the new year. Example:

  • Offer ID sequence: A24-998, A24-999, A24-1000 …

In our case, we wanted to prevent the offer numbers from becoming five digits (e.g. A24-1000) as soon as the new year begins. Instead, they will start again in January of the new year at A25-001.

🧩 The solution: annual reset via Power Automate

We have created a recurring Power Automate flow that is executed once a year at 00:01.

1. call up last offer

With the List Rows action:

  • Order By: createdon desc
  • Row Count: 1

This is how we retrieve the last quotation data record created.

2. apply to Each

We pack the output into an “Apply to each” loop:
outputs(‘List_rows’)?[‘body/value’]

To make it easier for us to access the fields later, we then use “Get a row by ID” to retrieve the complete offer data record and rename this step “Entity”.

3. check whether the year has changed

Now comes the core logic

We compare the year in the offer ID with the current calendar:

  • Extract year from offer ID

int(substring(outputs(‘Entity’)?[‘body/quotenumber’]
add(indexOf(outputs(‘Entity’)?[‘body/quotenumber’], ‘A’), 1), 2))

Result: 24

  • Extract current year

int(substring(formatDateTime(utcNow(), ‘yyyy’), 2, 2))

Result: 25

If the year in the offer ID is smaller than the current year, we reset the AutoNumber start value.

4. reset start value

We use the “Perform an unbound action” campaign:

  • Action Name: SetAutoNumberSeed
  • Target Field: quotenumber
  • Seed Value: 001

The next offer ID in the new year will therefore start again at A25-001.01.

✅ Result

This method keeps your D365 Sales clean and structured: The offer numbers always show the current year, without any manual intervention or the risk of IDs suddenly becoming five digits long.

I hope this guide has helped you.
Stay tuned for more useful tips and best practices to help you get the most out of Dataverse.
If you have any questions, please feel free to contact our Microsoft experts.